Orthopedic templating was one of the biggest evolutions in the field in the past years. This clinical strategy prevents complications and reduces both cost and time.
While digital templating is a huge advantage to orthopedic surgeons, it depends on the process of image capture. Thus strategies need to be taken into account to reach the best possible result possible.
Hence, x-ray Calibration needs to be taken into account by both Orthopedics and Radiology teams.
Especially if you want to take into account magnification radiography.
What is magnification radiography?
Magnification radiography is often performed to create an image larger than the object being studied. The X-ray source is often moved away or closer to influence the magnification process, depending on the objective.
This is because the beam of the X-ray travels in a straight line, diverging from the source. The objects that are hit first by the beam will be exaggerated and the ones closer to the detector smaller.
Hence, neither of the objects has its real size once captured.
However, at some point, as a surgeon, you will want to know the exact measurements – preferably before entering the OR.
Another example is how patient-specific body anatomy can influence magnification and measurement:
-
Picture a thin patient lying on the receptor that is only a few centimeters above the plate. This gives little distance for the X-rays to diverge.
-
In a larger patient, the distance may be twice as far from the detector, allowing the divergent beam to spread more after leaving the ray tube and before hitting the plate.
In both cases, magnification needs to be taken into account. Else it may lead to incorrect implant size, fractures, loosening, and even differences in leg length.
Issues related to orthopedics magnification can, however, be resolved with technology. How? By automating most of the steps to obtain the right scale.
This process is referred to as x-ray calibration. In this article, we will explain the best strategies to be taken into account when you are working with x-ray calibration, magnification, and scaling.
What is X-ray calibration and why you should do it?
X-ray calibration is the process of scaling the radiology image to the correct size, allowing the surgeon to know the real measure of the body part, bone, or organ.
Knowing the correct magnification of the fluoroscopic image results improves drastically the outcome before going into the OR.
Implant manufacturers provide conventional acetate templates to anticipate this issue, but these have fixed magnification. Thus, these only allow adequate implant sizing if the x-ray image magnification is equivalent.
These calculations might not be accurate, as it depends on several techniques used by the radiographers, the patient’s size, and position.
Even with a strict imaging protocol, the magnification of the X-ray image will vary from 110% to 130%.
Technology brings digital templating and virtual images to the table. The possibility to correct any magnification with mechanisms for scaling the image, too, became part of the solution.
This makes current planning methods with acetate sheets become outdated. While solutions such as surgical planning software that uses digital templates are today, a “must-have” tool.
To prevent any possible issues, we will guide you through how to perform x-ray calibration, a technique where image magnification is measured to accurately scale the anatomy – recurring to a preoperative planning tool.
The first thing you need to do is prepare your markers.
Orthopedic Markers: know the object distance and image size
Think of magnification as if you are looking through a magnifying glass and you can't perceive the real size of objects.
To know the real size, you place a calibration object or a radiopaque object of known dimension in a precise position in the X-ray’s field of view.
There are several alternative objects available for X-ray calibration and scaling. However, the lead markers for radiology and orthopedics are the ones that follow.
X-ray rulers
X-ray rulers have been used for a while. These, however, need to be placed in the plane of the joint – or another area of interest. Alternatively, they can also be held perpendicular to the x-ray beam.
These particularities might be tricky, as you need to ensure the ruler stays in the correct position while the image is acquired.
The advantage of rulers is that a scale of 50, 100, or even 150mm can be used which reduces the end error.

Image rights: www.aadcomed.com
X-Ray Calibration Sphere
Spheres, also known as x-ray calibration balls or orthosphere, can also be used as is often referred to as the most recommendable method for orthopedic scaling.
The main advantage of spheres is that orientation is not important as they are entirely symmetrical – usually with a 25mm diameter. Spheres might be mounted on an adjustable flexible arm. The arm allows the object to be correctly positioned in the same plane as the anatomy of interest quite easily.
Some argue that the disadvantage of an orthopedic calibration ball is that spheres can be quite heavy and difficult to hold in the correct plane, even using adhesive strips to hold them.
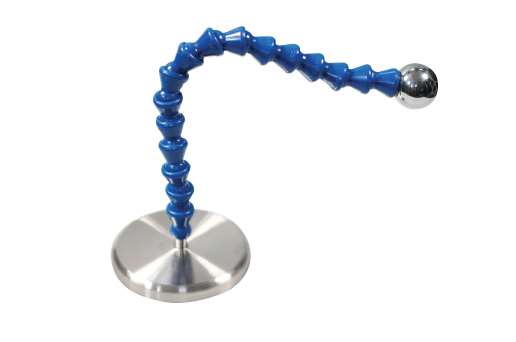
Image rights: jorvet.com
X-ray discs: are they still used?
X-Ray discs are also quite common, but in the last years have lost popularity.
For a while now, researchers have suggested that these are not as accurate. This leads to issues when doing the calibrations, thus being unreliable, some suggest.
Hence, physicians, specifically orthopedic surgeons, have been choosing different markers.
How to position the X-ray calibration markers for orthopedics
If you are planning to use magnification in orthopedics, some measures should be taken before ensuring the correct scaling of the X-rays.
As pointed out, this process requires you to place the chosen calibration device in strategic positions.
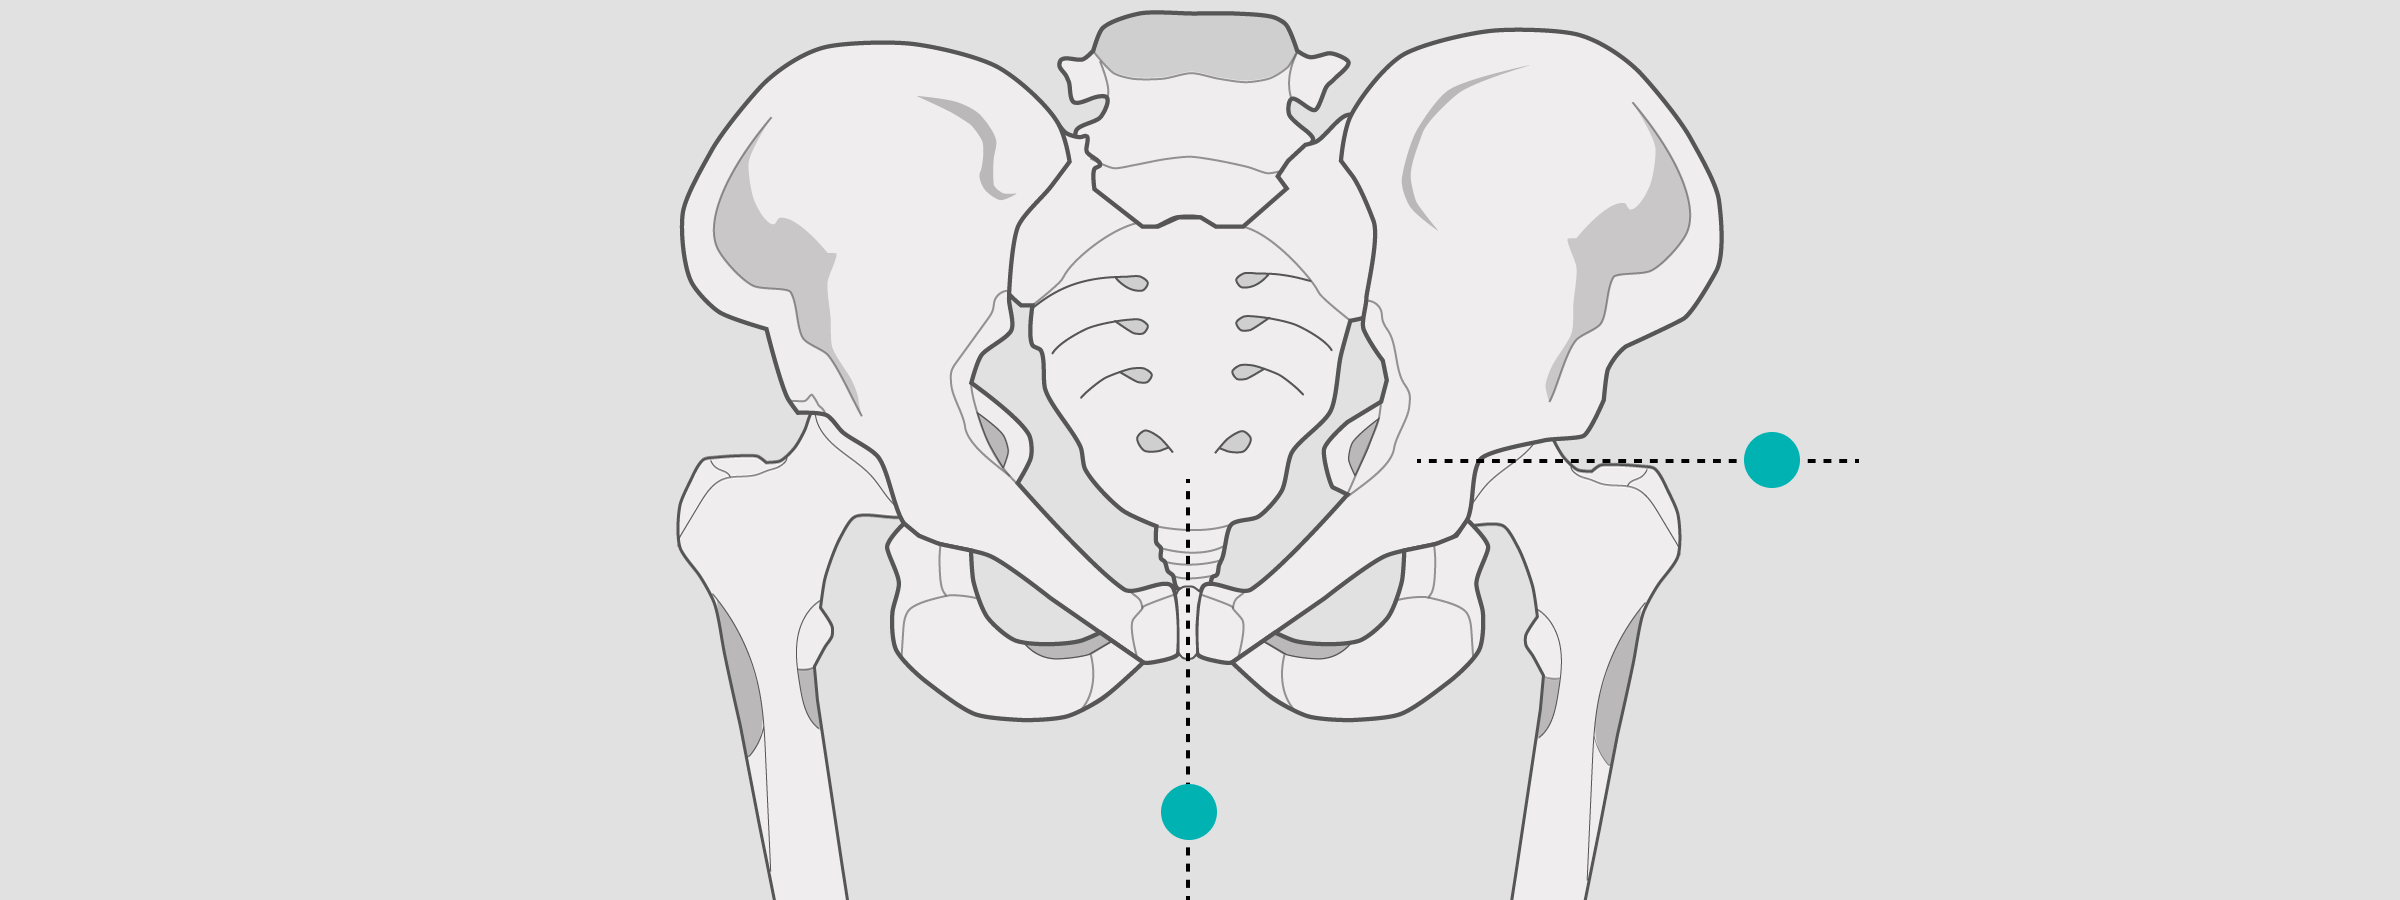
Hip
For pelvic views, position the X-ray sphere at the greater trochanteric level.
Be sure to position it close to the joints.
Should the patient be above the average weight, the X-ray sphere can be positioned medial in the ray of the symphysis.
Knee
For full-leg exposures and partial exposures, position the X-ray sphere in the joint space.

However, for lateral knee exposures, position the X-ray sphere in the popliteal fossa or patella. In both cases, the patient should be standing.

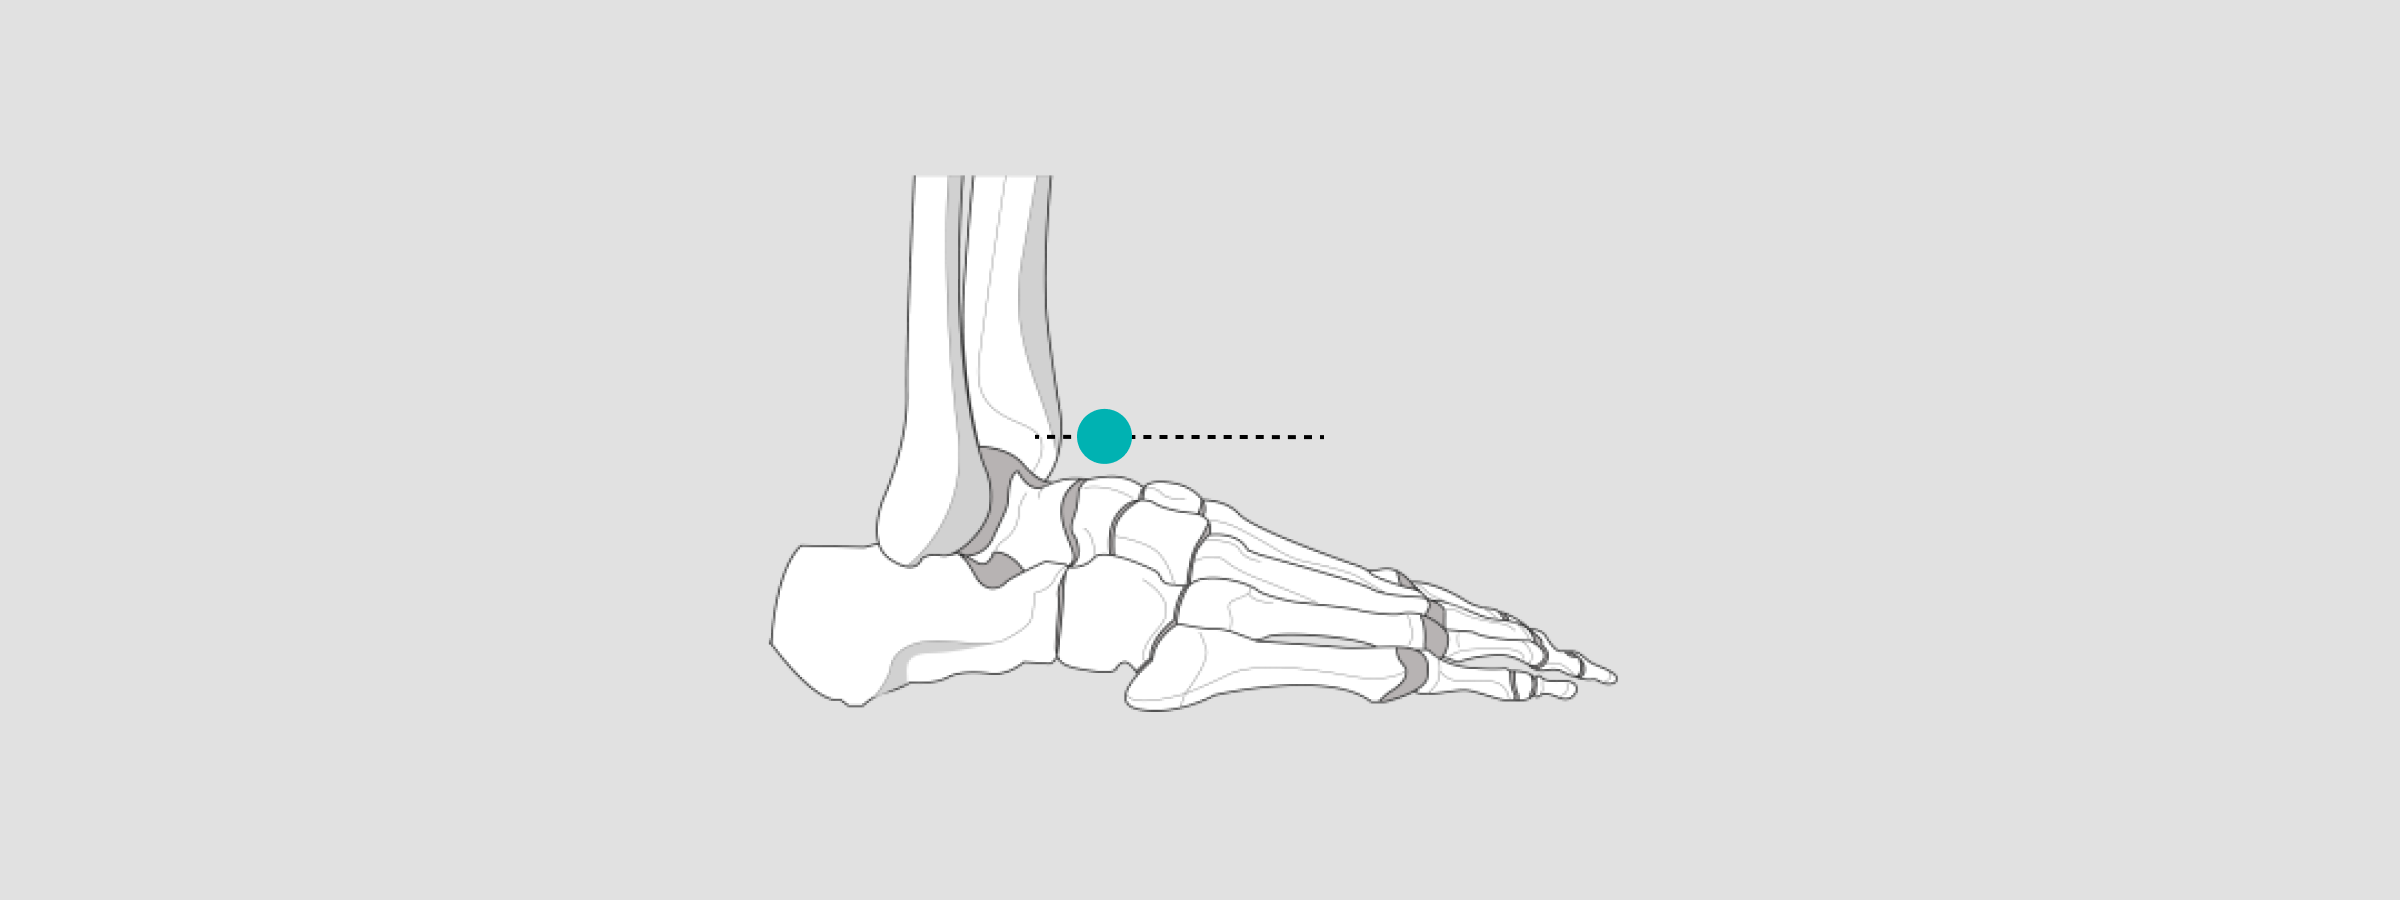
Ankle
If the ankle is the bony landmark of interest, position the calibration marker at the level of the medial or lateral malleolus.

Position the X-ray sphere at the level of the talus for sizing implant templates and taking measurements.
In the lateral view, the X-ray sphere should be positioned at the level of the talus & Os Cuneiforme II. This strategy will allow for the correct sizing of implant templates and taking measurements.
Foot
For hallux valgus measurements as well as corrections or toe implants, position the X-ray sphere at the level of the corpus phalanges or corpus ossis metatarsi.

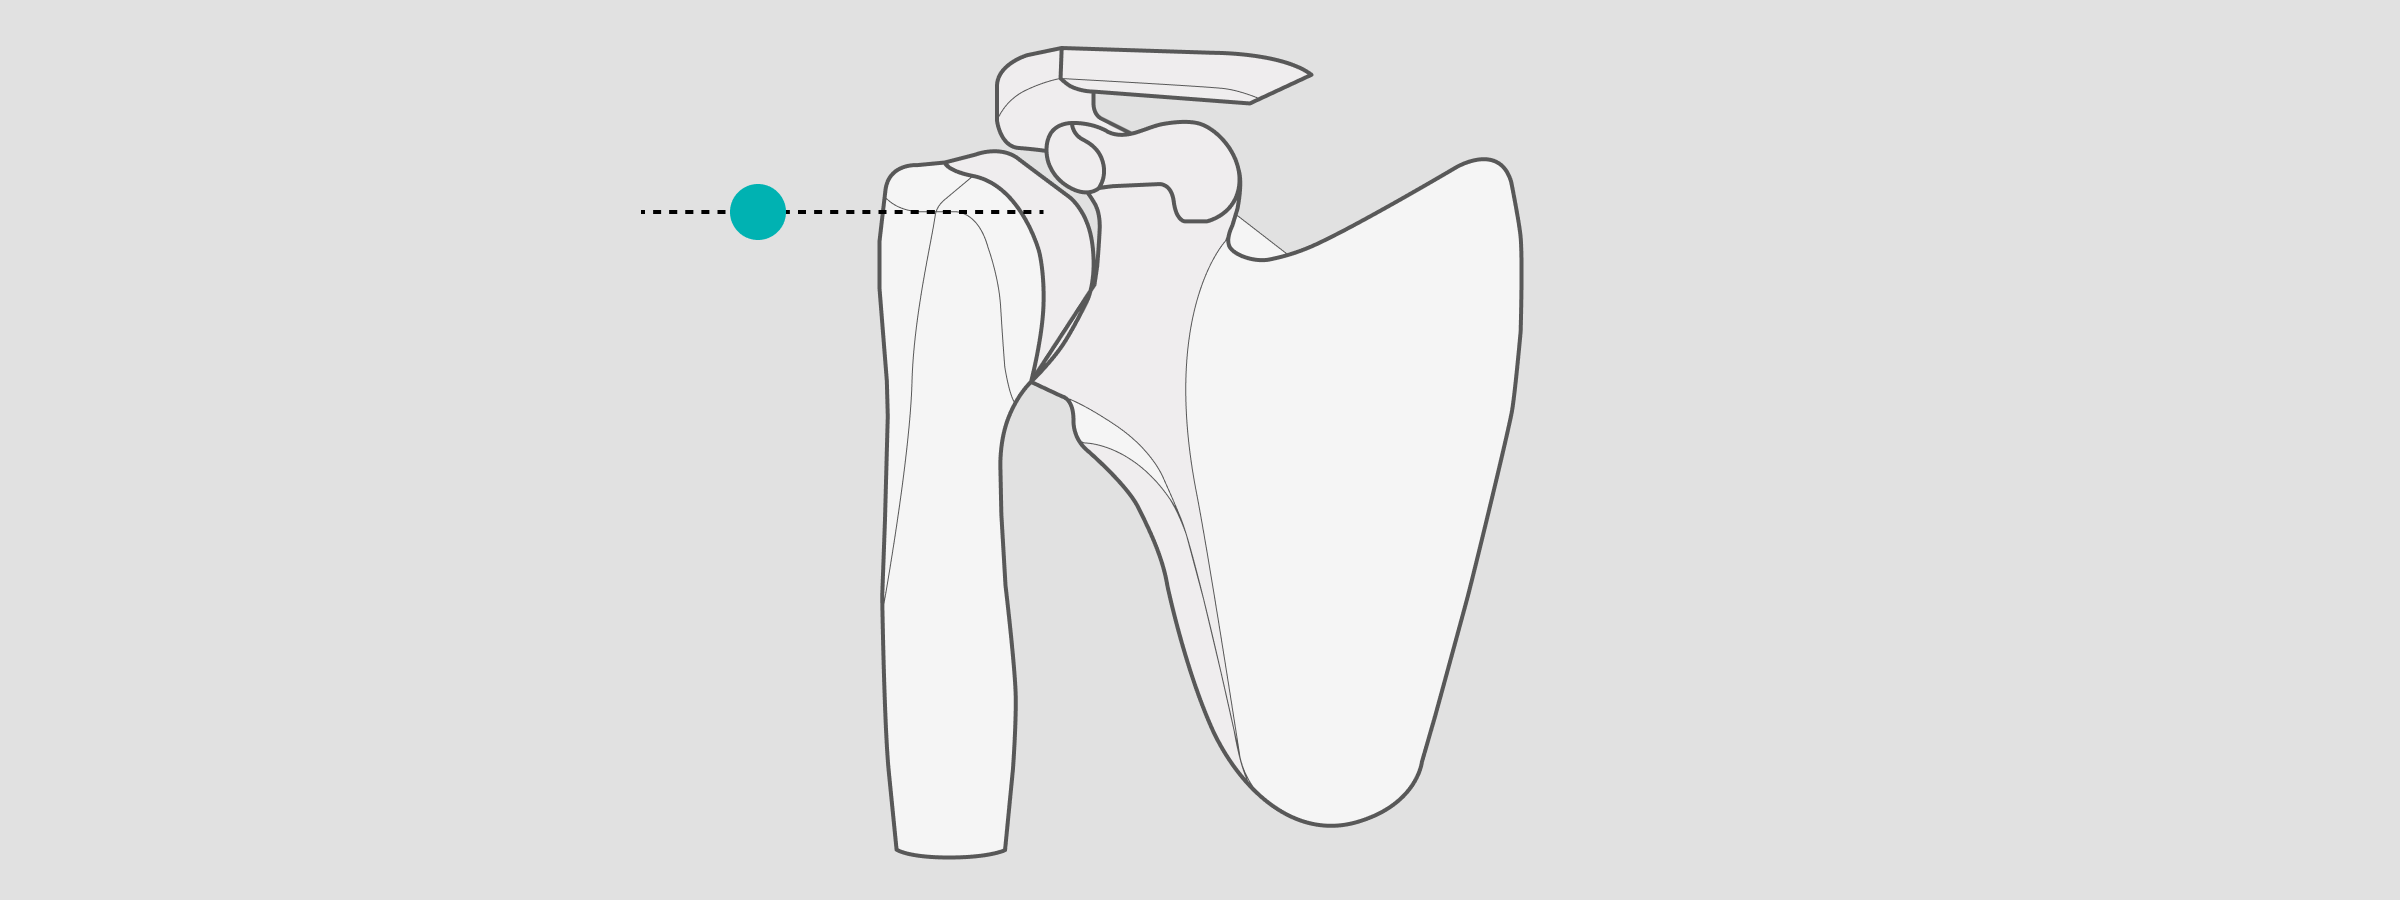
Shoulder
When preparing for shoulder templating and measurements, position the X-ray sphere at the level of the greater tubercle in the glenohumeral joint ray.
Finger
When taking images of a finger, position the X-ray sphere at the level of Artt.interphalangeales proximales and Artt. metacarpo phalangeales.

Wrist
As for the wrist, the X-ray sphere is to be placed at the level Proc. styloid radial.

Elbow
When positioning the X-ray sphere for radial head prostheses or elbow joint templates, position it at the level of the humeroradial joint.
For radial head prosthesis templates, the X-ray sphere should be positioned at the level of the radial head.

Spine
When preparing for a spine procedure, the Sphere should be positioned to the vertebra where correction is to be made. Posterior to the spinous process.

How to calibrate X-ray with PeekMed
After positioning the markers and capturing the image you are ready to start calibrating. This is where you can take advantage of digital templating and preoperative planning solutions.
With PeekMed the x-calibration process can be done in a matter of seconds. By loading the images into PeekMed, the technology will provide you with all the insights necessary.
For that, you need to select the markers on the image. As these have defined measures, the algorithms will perform all the needed calculations.
This can be done in two different ways:
Automatic Calibration
This one is quite obvious. By selecting the automatic tool PeekMed will find the marker and you just need to specify the measure of it. But there's always an alternative.
Manual
When you select the manual scaling option, you must draw a line or a circle and identify its real size in the field Ruler length or Circle radius, respectively.
To draw the line, you must select the Ruler option. A default line will be added to the image. Then, you can reposition and resize this line by clicking on its extremities (handles) with the left mouse button.
If the image has a circular marker (e.g. a sphere), choose the circle option. A circle will automatically appear as soon as you click on this option. Then, you only need to resize it according to the marker. The actual size must be specified in the appropriate field, in the scaling section.